|
Monthly Guide
for Growing Dahlias
in
the Bay Area
by Ted Marr, Deborah Dietz, Rose Marr |
|
Dormant December
|
|
 We
start Dahlia Calendar with December because December
is the end and beginning of Dahlia Seasons. End for this
season; and, the beginning for the next. Getting off on the
right step is critical for next year’s crop. We
start Dahlia Calendar with December because December
is the end and beginning of Dahlia Seasons. End for this
season; and, the beginning for the next. Getting off on the
right step is critical for next year’s crop.
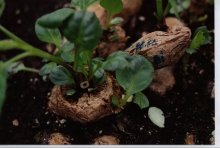
 Dig
out:
Dig up your
clumps, keeping as much dirt around each as possible. Shovel
a 1’ radius circle STRAIGHT DOWN around your plant. This
severs any extended roots. Using opposable shovels or forks
or a combination of both, gently jimmy up the root mass. DO
NOT extricate by pulling up on the neck or stalk
portion—this could break several necks. Rather, scoop under
the clump with your hands. An alternative method, is digging
a moat around the clump so you know how far the tubers
extend. Read more in
Dec. 2003 ,
Dec. 2004 and Dec. 2005 DSC eNewsletters on how to
handle the dig out without breaking the tubers. See
how
DSC Member do a digout. Dig
out:
Dig up your
clumps, keeping as much dirt around each as possible. Shovel
a 1’ radius circle STRAIGHT DOWN around your plant. This
severs any extended roots. Using opposable shovels or forks
or a combination of both, gently jimmy up the root mass. DO
NOT extricate by pulling up on the neck or stalk
portion—this could break several necks. Rather, scoop under
the clump with your hands. An alternative method, is digging
a moat around the clump so you know how far the tubers
extend. Read more in
Dec. 2003 ,
Dec. 2004 and Dec. 2005 DSC eNewsletters on how to
handle the dig out without breaking the tubers. See
how
DSC Member do a digout.
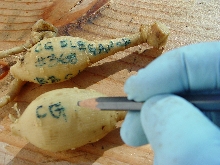 Processing:
After
you pulled up your clumps, you have two choices on what to
do with your clumps. 1. Process them immediately: Dig,
divide, bleach, daub with sulphur or Captan, and store in
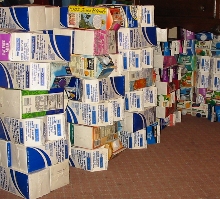
vermiculite or cedar shavings. 2. Maintain as much dirt
adhering to your tuber clump as possible and put the whole
megalith in a cardboard box, close it up and stack in a cool
but not freezing spot until March. This method avoids
dividing the clump immediately. You wait until the spring
when little green shoots appear and the dividing spots are
more obvious. Where to divide will be greenly obvious! Read
more in
Dec. 2003,
Dec. 2004 and Dec. 2005 DSC eNewsletters on how
handle the entire process. Processing:
After
you pulled up your clumps, you have two choices on what to
do with your clumps. 1. Process them immediately: Dig,
divide, bleach, daub with sulphur or Captan, and store in
vermiculite or cedar shavings. 2. Maintain as much dirt
adhering to your tuber clump as possible and put the whole
megalith in a cardboard box, close it up and stack in a cool
but not freezing spot until March. This method avoids
dividing the clump immediately. You wait until the spring
when little green shoots appear and the dividing spots are
more obvious. Where to divide will be greenly obvious! Read
more in
Dec. 2003,
Dec. 2004 and Dec. 2005 DSC eNewsletters on how
handle the entire process.
Hands on lesson:
Best place to learn how to process a dug out clump is come
to the DSC Big Dig which occurs each year around the second
or third weekend in January.
Pre-prepare the soil:
As
soon as your clumps are up, the new season begins. Start by spreading compost
lavishly. Some people plant a cover crop of vetch or fava
beans which nitrogenate the soil as well as covering the
ugly brown patch. |
|
DSC Activities in December:
Lopping Day first weekend, Christmas Party second Tuesday.
Pay annual membership fee. |
|
Jumpstart January |
|
This
is the month to prepare your soil and plan what dahlias to
grow. Soil preparation consists basically of weeding and
fortifying with compost and fertilizer.
 Weed:
The more
assiduously you eradicate unwanted green things now, the
fewer you’ll have to deal with coming planting time. Keep
the weeds obliterated; a little work now saves backbreaking
labor later. Weed:
The more
assiduously you eradicate unwanted green things now, the
fewer you’ll have to deal with coming planting time. Keep
the weeds obliterated; a little work now saves backbreaking
labor later.
Prepare flower beds:
Larder
your patch with compost: leaves, grass clippings, steer or
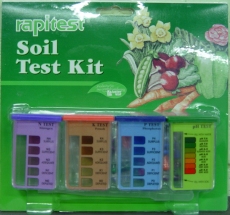
chicken guano. Check your pH & adjust accordingly, ideally
at between 6.5 to 7.0. One commecial product readily
available in a number of local hardware stores is the
"Rapitest" soil test kit by
Luster Leaf. Allow 6+ weeks before planting for fear of burning
delicate roots with fiery urea.
  Plotting
the Patch:
Plot your
plot to determine what new dahlias you need for next season.
Dream through dahlia catalogs, cruise the
BIG LIST,
and contact the
suppliers. Order from these suppliers whom DSC members
are satisfied customers:
Corralitos
Gardens,
Mingus,
Pioneer,
Dan’s Dahlias,
Ferncliff.
Start negotiating with DSC members for scions of their
jewels from last season. Plotting
the Patch:
Plot your
plot to determine what new dahlias you need for next season.
Dream through dahlia catalogs, cruise the
BIG LIST,
and contact the
suppliers. Order from these suppliers whom DSC members
are satisfied customers:
Corralitos
Gardens,
Mingus,
Pioneer,
Dan’s Dahlias,
Ferncliff.
Start negotiating with DSC members for scions of their
jewels from last season. |
|
DSC Activities in January:
The BIG OUT. Information on getting started indoors at
regular second Tuesday meeting. |
|
Fuss February |
|
Anticipating spring, get your dahlia tubers
germinating and pot-tuber cuttings ready to go. Regardless
of your facilities, start germination indoors. Giving the
plants a head start will produce blooms even as early as
May!
 Greenhouse:
Find a
sunroom, bathroom, loft, basement or garage with sufficient
lighting. There are lots of way to build an indoor
greenhouse. The easiest and least expensive is
Tinnee’s method. Greenhouse:
Find a
sunroom, bathroom, loft, basement or garage with sufficient
lighting. There are lots of way to build an indoor
greenhouse. The easiest and least expensive is
Tinnee’s method.
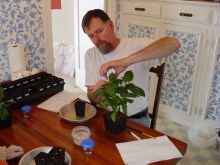
 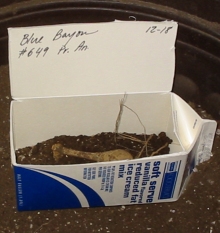  Planting
to Germinate: Time
to milk carton. Use a mixture of 1/3 potting soil, 1/3 sand
& 1/3 vermiculite or perlite, or, just commercial potting
mix. Lay
the tuber on its side as though it were taking a nap. Have
the eye pointing up. Make sure you label the flap accurately
with the name of the plant. Place them by warm windows or
by the water heater. Some of the A’s and AA’s need a lot of
heat to sprout. If
you are space challenged, close cartons until they sprout.
Be sure to check regularly. Planting
to Germinate: Time
to milk carton. Use a mixture of 1/3 potting soil, 1/3 sand
& 1/3 vermiculite or perlite, or, just commercial potting
mix. Lay
the tuber on its side as though it were taking a nap. Have
the eye pointing up. Make sure you label the flap accurately
with the name of the plant. Place them by warm windows or
by the water heater. Some of the A’s and AA’s need a lot of
heat to sprout. If
you are space challenged, close cartons until they sprout.
Be sure to check regularly.
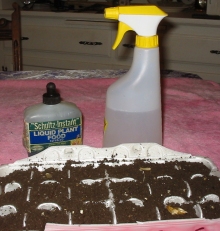
Water:
Start
out with the soil slightly moist, do not water at all until
green sprouts appear. Then, spritz sparingly. Spritz with
water or even with Miracle Grow. Remember, there are very
few roots yet to absorb water, so be sparing. Use a mulch
to help the soil retain the moisture.
Order more Plants:
Last chance to order from catalogs. For details see
January.
Interesting Tip:
Sprinkle
double poppy seeds around the flower beds. These colorful
flowers cover the bare brown earth until replanting.
|
|
DSC Activities in February:
Information on planting, cutting, and propagation at second
Tuesday meeting. ADS new
introductions. |
|
Mindful March |
|
 With warming weather, mind your germinating
dahlias carefully. The young shoots are delicate and require
tender loving care. With warming weather, mind your germinating
dahlias carefully. The young shoots are delicate and require
tender loving care.
Faster
Germination and Growth:
Placing your
tubers in a warm environment will promote fast growth.
Ostensibly, dahlias germinate above 62 degrees F.
 Mindful
of Rot:
Check your
stored tubers regularly for rot
. Spritz only when the sprouts appear. Mindful
of Rot:
Check your
stored tubers regularly for rot
. Spritz only when the sprouts appear.
 Cuttings:
When
there are more than one shoot coming out of a tuber, cut the
extra one off or germinate it for another plant. Learn
How to grow more plants from multiple shoots of one tuber by
Lou Lombardo. Cuttings:
When
there are more than one shoot coming out of a tuber, cut the
extra one off or germinate it for another plant. Learn
How to grow more plants from multiple shoots of one tuber by
Lou Lombardo. |
|
DSC Activities in March:
Overview information on planting Dahlias at regular Tuesday
meeting. |
|
Arresting April |
|
An exciting month. This is the month you can
finally start to plant. And then there is the DSC Annual
Tuber and Cutting sale.
 Hardening:
Before you plant into the ground, harden the young plants.
When your milk carton dahlias are 8”+ high, begin putting
them outside during the day time. Eventually you can leave
them out overnight. Then they are “hardened off” and ready
to plant. You can make individual greenhouses by erecting a
stick in the middle of your container and tenting the whole
thing with a clear plastic bag. Hardening:
Before you plant into the ground, harden the young plants.
When your milk carton dahlias are 8”+ high, begin putting
them outside during the day time. Eventually you can leave
them out overnight. Then they are “hardened off” and ready
to plant. You can make individual greenhouses by erecting a
stick in the middle of your container and tenting the whole
thing with a clear plastic bag.
Planting – Finding a right spot:
When the plants are about 18 inches tall, plant them in the
ground. The location should have sunshine for at least 6
hours each day. Place the plants 30 or more inches apart. In
hot weather areas, choose a spot with morning sun only. Try
to ascertain which are your potentially tallest dahlias to
place them in the back with your little twitchy clumps in
the front. Dig a hole 6-8” deep; mix in a balanced
fertilizer (10-10-10, 16-16-16). We do not recommend
planting rootless tuber into the ground directly. If you
must, absolutely avoid watering until the shoots appear
above the ground.
 Planting
– Preparing the spot:
Dahlias like well drained soil so augment your soil with
organic material, such as chicken manure and compost. Or,
add two or three pounds of 5-10-5 or 10-10-10 or 16-16-16
fertilizer to 100 square feet (1/4 pound per 10 square
feet). Avoid getting the fertilizer on the plants. Rake the
fertilizer into the soil and then water. Planting
– Preparing the spot:
Dahlias like well drained soil so augment your soil with
organic material, such as chicken manure and compost. Or,
add two or three pounds of 5-10-5 or 10-10-10 or 16-16-16
fertilizer to 100 square feet (1/4 pound per 10 square
feet). Avoid getting the fertilizer on the plants. Rake the
fertilizer into the soil and then water.
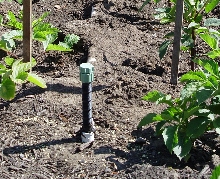
Label and stake:
Insert a
four to six foot stake into the ground at the edge of the
hole before the tuberous roots are planted. Dahlias are
large plants and require support. Label Immediately. You
will get confused later. The tall cultivars cannot support
themselves and plant breakage will occur without support.
 DANGER
:
As soon as the plants are in the ground, on the same day,
protect your young plants from snails and slugs. Sprinkle
snail bait liberally. DANGER
DANGER:
As soon as the plants are in the ground, on the same day,
protect your young plants from snails and slugs. Sprinkle
snail bait liberally.
Watering:
Watering
varies, depending on what you plant. However, never over
water and do not leave stagnant water around young tuber
plants. Cuttings need almost daily watering; they have wee
roots but no tuber to sustain them. Sprouted tubers from
milk cartons should be watered immediately upon planting and
then watched for signs of drying depending on the weather.
Water at the soil level; no overhead watering.
Insurance:
Remember to keep 30-50% extra dahlias as insurance. So if
you plan to plant 20, keep 4 to 10 in milk cartons as back
up. Bring the extras to DSC meetings in May for sale or
give away. |
|
DSC Activities in April:
Tuber and plant sale fist Saturday of April. |
|
Munchingly May |
|
May is the month to watch your Dahlias take
shape and start to mature on their journey for another year
of glorious blooms.
  Watering:
Water
at the soil level (do not use overhead spray) once every
three to four days. Water deeply each time. Do not leave
any stagnant water. Remember that tubers & cuttings need
drastically different levels of watering. Cuttings rely on
new roots, necessitating frequent quenching; tubers start
with no roots, so should only be watered sparingly. Watering:
Water
at the soil level (do not use overhead spray) once every
three to four days. Water deeply each time. Do not leave
any stagnant water. Remember that tubers & cuttings need
drastically different levels of watering. Cuttings rely on
new roots, necessitating frequent quenching; tubers start
with no roots, so should only be watered sparingly.
Fertilize:
Remember to fertilize with a well balanced fertilizer
(10-10-10) about once every three weeks. Surround delicate
plants with individual milk carton sheaths to protect from
sun and wind exposure.
  Protect
from pests:
Ply liberally
with slug, snail and earwig bait; succulent new leaves lure
voracious bugs from everywhere. Diligently monitor and
eradicate undesirable pests. Protect
from pests:
Ply liberally
with slug, snail and earwig bait; succulent new leaves lure
voracious bugs from everywhere. Diligently monitor and
eradicate undesirable pests.
Bushy Plants:
Your plants will grow tall rapidly. To encourage the plants
to grow more branches cut off the tip of the center stem
after the plant has three sets of leaves. As the plant
matures, remove the bottom two rows of leaves. And, be sure
to tie the main stem to the stake. |
|
DSC Activities in May:
Information on Fertilizing and pest control at regular
meeting on second Tuesday. |
|
Jubilant June |
|
June is jubilant because your first bud or
even the first bloom has arrived. Now is the time to make
sure you get the best blooms.
  Disbud:
It is time to pinch and disbud. Certain plants harbor the
first bud tightly down in the center where it would be
terribly crotch-bound were it to bloom. Pinch out the first
bud with the two new buds beside it. This allows the next
buds to have longer, stronger stems & encourages the plant
to be a little bushier rather than too tall. Disbud:
It is time to pinch and disbud. Certain plants harbor the
first bud tightly down in the center where it would be
terribly crotch-bound were it to bloom. Pinch out the first
bud with the two new buds beside it. This allows the next
buds to have longer, stronger stems & encourages the plant
to be a little bushier rather than too tall.
Airing the bottom:
As your plant reaches 24+” begin to take off the bottom
leaves, discouraging snails, slugs & mildew. Remove
non-flower producing leaves to encourage growth, allow more
light into the plant, and for better air circulation.
 Recycle:
Compost dahlia refuse carefully. Like any composting, make
sure you follow the directions carefully. Lots of benefits
in composting: good for the
environment, obligate parasites, and good for your soil. Recycle:
Compost dahlia refuse carefully. Like any composting, make
sure you follow the directions carefully. Lots of benefits
in composting: good for the
environment, obligate parasites, and good for your soil.
Fertilize:
With the arrival of the first bud, it is time to switch to a
different fertilizer. Using a fertilizer that has a higher
phosphorous content, such as 10-30-20 will encourage more
blooms.
Pest Control:
Be vigilant. A bloom with deformed leaves or leaves with
holes does not show well. Fend off, at all effort, snails,
earwigs, etc.
Fungus:
Now you will encounter for the first time, the growth cycle
another difficult matter: fungus. Spray a cocktail of
Malathion (for aphids or caterpillars), Fungi-Fighter or
Funginex (for powdery mildew), water soluble fertilizer, and
a little liquid dishwashing soap as a sticker. |
|
DSC Activities in June:
Information on photography at regular meeting on second of
Tuesday. |
|
Jumping July
|
|
This is a busy month, the plants are budding
all over. Buds, buds all over. |
|
|
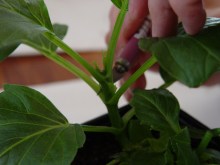
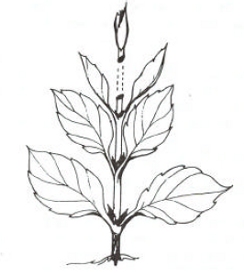
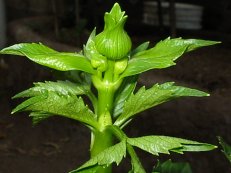
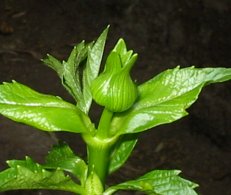
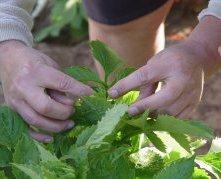
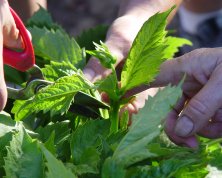
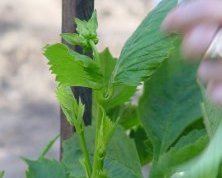
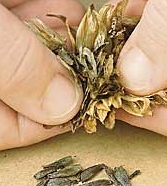
Finding the
Central bud and leaf pair
Carefully
Disbudding
|
 |
 |
|
 Disbudding:
Buds are popping all over. Diligently disbudding will reward
you with exhibition quality blooms. Two or three headed
blooms are of lesser quality because they are much smaller
and can be deformed. Leave only one bud. Disbudding:
Buds are popping all over. Diligently disbudding will reward
you with exhibition quality blooms. Two or three headed
blooms are of lesser quality because they are much smaller
and can be deformed. Leave only one bud.
Deadheading:
This is critical to keep your dahlia plant producing more
blooms. After a Dahlia bloom opens, cut it for your indoor
display. This will encourage more blooms. Even if you don’t
cut it, you should dead-head it by removing it just when pollen
appears for a "double" plant or when the petals begin
drooping on an "open-centered" variety. Deadheading is
important so new blooms would be encouraged and energy is
not directed to making seeds. Always cut the
bloom at a point that is one node below the bloom (the next
node). This will
encourage more laterals to produce more blooms.
Busy, busy doing the routines:
Clean out the under leaves, spraying, watering, fertilizing,
all this demands your time now. Clean out the under
growth of leaves, allowing for at least 12 inches of space
above the ground for good air circulation.
Pictures:
Start taking pictures of early blooms to enter into the
photo competition. Check out the Dahlia Dell at the
Golden Gate Park as new varieties
begin blooming. |
|
DSC Activities in July:
First mini show at regular second Tuesday meeting. |
|
Awesome August |
|
 August is the celebratory month for Dahlia
lovers. The peak of bloom is here. What an amazing sea of
color and cacophony of shapes shouting at the admirers. August is the celebratory month for Dahlia
lovers. The peak of bloom is here. What an amazing sea of
color and cacophony of shapes shouting at the admirers.
 Exhibition:
Whether it is to enter a show or just for your own
enjoyment, cut early in the morning or later evening
and put the bloom immediately in water. Some suggest
that touching the ends in alum sustains the blooms longer. Exhibition:
Whether it is to enter a show or just for your own
enjoyment, cut early in the morning or later evening
and put the bloom immediately in water. Some suggest
that touching the ends in alum sustains the blooms longer.
Abundance:
To keep your dahlias blooming in full spate, assiduously
dead head; cut your spent blooms below the set of first
leaves where the new growth begins. If you fail to cut
back to new growth, your plants will soon look like brown
skeletons. Disbud to assure only one bloom per stem
with a nice pair of leaves. Truly you get a bigger
flower, longer stem, and more plant vigor if you do not let
every bud blossom. Give your growing plants support.
If you have the luxury of multiple stakes, you can put one
on either side of your plant and wrap ties around the whole
bundle. If not, string the plant staunchly to the
stake to prevent wind damage and give the heavy laterals
some support.
Be vigilant:
Control pests, clean out lower branches, arrest fungus,
fertilize, and water properly. You are ensured of a truly
amazing August. |
|
DSC Activities in August:
Regular second Tuesday meeting mini show.
And DSC and other Bay Areas Big Annual shows. |
|
Scintillating September
|
|
Although peak season is over, September will
continue to give you a bountiful bloom. Bestow bouquets on
all your friends! Keeping the plants at top performance
will not only give another couple months of pleasure but
also will ensure you have a healthy crop next year.
 Practice bondage:
Tie up your plants or the wind will make you weep.
Take the low laterals off now. They will break off when they
are heavier, so get them now and send that energy to the
branches where you need growth & flowers. Practice bondage:
Tie up your plants or the wind will make you weep.
Take the low laterals off now. They will break off when they
are heavier, so get them now and send that energy to the
branches where you need growth & flowers.
Keep the Bandits at bay:
Aphids, caterpillars
and diabolical beetles abound. Try the traditional cocktail
for the first two: Malathion, Orthene, a fungicide, Superbloom, & liquid dishwashing soap applied in a sprayer.
For diaBRATicas, try painting Dixie cups with Tanglefoot
atop your stakes. Squishing with fingers works
satisfyingly, too. If you are fighting powdery mildew, strip
off the dusted leaves and spray with a MAJOR fungicide.
 Water and fertilize:
Water when your plants show heat fatigue; this could be
once a day or once a week depending on the weather.
Fertilize as needed. Water and fertilize:
Water when your plants show heat fatigue; this could be
once a day or once a week depending on the weather.
Fertilize as needed.
 Disbudding and Deadheading:
Cut clear back to the next growth-producing flowers.
The more rigorously you cut back, the more your plants will
flourish. Also, strip off the “rags” (limp brown leaves at
the bottom of bushes). The more zealously you do
these things, the longer your plants will continue to bloom. Disbudding and Deadheading:
Cut clear back to the next growth-producing flowers.
The more rigorously you cut back, the more your plants will
flourish. Also, strip off the “rags” (limp brown leaves at
the bottom of bushes). The more zealously you do
these things, the longer your plants will continue to bloom.
Evaluate:
Time to evaluate which plant shall be replanted next year.
Critically evaluate each bush. If it is substandard
and not worthy of passing on its tubers, chuck the whole
plant in the garbage now. If you have two or more of
the same cultivar, evaluate which is superior. Make
note on your label so you will know which one to replant in
the spring. Transfer labels down to around the base of the
plant so that they will be attached even when they are
whacked in December. |
|
DSC Activities in
September: Novice only mini show at the regular second
Tuesday meeting. |
|
Outstanding October |
|
Yes, October can be outstanding. Lots of
blooms even so late in the season. Make October your
outstanding month with surprise gift blooms to friends and
at the office.
 Mildew:
The mildew plague is upon us. Strip
every affected leaf & spray with RosePride, previously
called Funginex or Orthenex. Or, the systemic Orthenex, but
it is nastier & more dangerous than others so be very
cognizant of what you are doing and shower immediately
afterwards. Wait a week & spray again. You can add some
SuperBloom & dishwashing soap to your cocktail. When in
question, toss out those really badly affected. Mildew:
The mildew plague is upon us. Strip
every affected leaf & spray with RosePride, previously
called Funginex or Orthenex. Or, the systemic Orthenex, but
it is nastier & more dangerous than others so be very
cognizant of what you are doing and shower immediately
afterwards. Wait a week & spray again. You can add some
SuperBloom & dishwashing soap to your cocktail. When in
question, toss out those really badly affected.
 Doubling the effort:
As your bloom size dwindles, try double disbudding: taking
off both the extra buds next to the central stem, and also
the emerging shoots just below the first leaf pair.
This will channel all the energy to the remaining bloom. Doubling the effort:
As your bloom size dwindles, try double disbudding: taking
off both the extra buds next to the central stem, and also
the emerging shoots just below the first leaf pair.
This will channel all the energy to the remaining bloom.
 Water and Fertilize:
Do it one more time. Fertilize one more time. Cut back
to vibrant growth. If October proves warm, we may get
a final flush. Don’t worry if your lovely flowers start
popping center or getting a bit scraggly; they are
responding to the waning light. As your plants slow
down, cut back on water. Water and Fertilize:
Do it one more time. Fertilize one more time. Cut back
to vibrant growth. If October proves warm, we may get
a final flush. Don’t worry if your lovely flowers start
popping center or getting a bit scraggly; they are
responding to the waning light. As your plants slow
down, cut back on water.
Tag:
Check name tags for accuracy. Move name tags
down and tie them around the bottom of the plant so they
will still be attached when lopping in December.
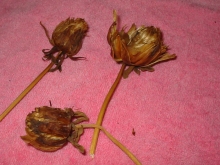
Seedlings:
Now is the time to consider allowing a few blooms to
go to seed. Seeds are the genetic lottery; dreadful
odds but such a payoff! Simply let the petals fall
off; wait until the remaining seed head is brown and dry.
Bring into a cool, dry area for germinating in January. |
|
DSC Activities in October:
The last mini show at the regular second Tuesday meeting. |
|
Nonchalant November |
|
 November is practically the end of the bloom
season. If you worked real hard over the season, you will
get some blooms until Thanksgiving. Time to wrap up for the
year. November is practically the end of the bloom
season. If you worked real hard over the season, you will
get some blooms until Thanksgiving. Time to wrap up for the
year.
Stop watering:
The waning seasonal light prematurely pops centers,
attenuates stems, & slows down growth. Let nature
take its own course and provide growth to the tubers for
next year’s crop.
Labels:
Make sure your labels are legible. And, move them down to
the bottom of the plant.
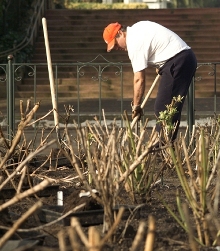
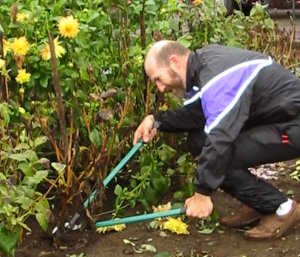 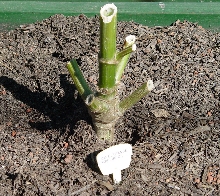 Lopping:
Lop every plant. That will give the tubers 8 weeks to
toughen their skins and go dormant before digging out in
December or January. Depending on how well your soil drains,
you can dig them out before the first frost. When each plant
turns brown, cut down to 4-5 bamboo-like notches; these act
as water seals. Each bamboo-like joint is a mini water seal
to help prevent crown rot. If your plants are in pots,
move them to a sheltered area or cover to prevent rain from
rotting them. Allow your tubers to go dormant for at
least 6 weeks before disinterring. They seem to develop
tougher skin if they are allowed to go fully dormant. Lopping:
Lop every plant. That will give the tubers 8 weeks to
toughen their skins and go dormant before digging out in
December or January. Depending on how well your soil drains,
you can dig them out before the first frost. When each plant
turns brown, cut down to 4-5 bamboo-like notches; these act
as water seals. Each bamboo-like joint is a mini water seal
to help prevent crown rot. If your plants are in pots,
move them to a sheltered area or cover to prevent rain from
rotting them. Allow your tubers to go dormant for at
least 6 weeks before disinterring. They seem to develop
tougher skin if they are allowed to go fully dormant. |
|
DSC Activities in
November: Annual DSC member meeting and election of
Officers. Lopping day either last weekend of November or
first weekend of December. Lou P. demonstrates digout and
dividing of tubers at the regular Tuesday meeting. |
|
Photos courtesy of various
DSC members including: Deborah, Ted, Franck, DJ and many
others.
We like to thank many DSC Dahlia Experts for sharing their
years of experience at our regular meetings. Without them,
this essay could not have been written. |


