|
|
There are many
approaches to growing healthy and happy Dahlias. These
“Simple Five Steps” are intended to be one of the
approaches. These suggestions are generally consider more
reliable and safer methods. They have been time tested by
many experienced Dahlia growers. |
|
|
Step 1: GERMINATION (March to May)
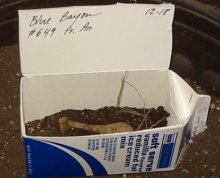   Purchase
dahlia cuttings (preferred) or tubers at the DSC Annual Sale
(first Saturday of every April) at the Hall of Flowers,
Golden Gate Park. Transfer the cuttings to a
larger temporary container (4 inch pots or a milk carton cut
open sideway with drainage). Let them grow indoors in a well
lighted room until they are about 12 to 18 inches tall. Be
sure to keep the soil moist, but do not water at all. For
tubers, place each tuber in the same kind of temporary
containers with the crown (buds) of the tuber sticking
slightly above the soil. When the shoots appear, allow only one to grow per
tuber, cut off the
excess ones. Spritz the young shoots at least once every
other day to keep them moist. Purchase
dahlia cuttings (preferred) or tubers at the DSC Annual Sale
(first Saturday of every April) at the Hall of Flowers,
Golden Gate Park. Transfer the cuttings to a
larger temporary container (4 inch pots or a milk carton cut
open sideway with drainage). Let them grow indoors in a well
lighted room until they are about 12 to 18 inches tall. Be
sure to keep the soil moist, but do not water at all. For
tubers, place each tuber in the same kind of temporary
containers with the crown (buds) of the tuber sticking
slightly above the soil. When the shoots appear, allow only one to grow per
tuber, cut off the
excess ones. Spritz the young shoots at least once every
other day to keep them moist. |
Other tips:
a.
How to set
up a home green house by
Tinnee Lee
b.
How to grow more plants from multiple shoots of one tuber by
Lou Lombardo. |
|
|
|
Step 2: PLANTING (April to June)
 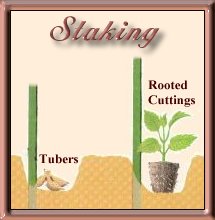 When your plants are 8 inches tall, put them outside during
the day. After a few days, you can leave them outside
overnight. When the plants are about 18 inches tall, plant
them in the ground. Dahlias like well drained soil. While
your plants are germinating, start to augment your soil with
organic material, such as chicken manure and compost. Or,
add two or three pounds of 5-10-5 or 10-10-10 fertilizer to
100 square feet (1/4 pound per 10 square feet). You should
start your fertilization process about 6 weeks prior to
planting if using chicken manure which takes time to break
down. Avoid getting the fertilizer on the plants so rake the
fertilizer into the soil and then water. The location should have sunshine for at least 6 hours each
day.
Place the plants 30 or more inches
apart.
In hot weather areas, choose a spot
with morning sun only. As soon as the plants are in
the ground, on the same day, protect your young plants from
snails and slugs. Sprinkle snail bait liberally. Label and
stake plants other than the dwarf cultivar. Insert a four to
six foot stake into the ground at the edge of the hole
before the tuberous roots are planted. Dahlias are large
plants and require support. The tall cultivars cannot
support themselves and plant breakage will occur without
support. When your plants are 8 inches tall, put them outside during
the day. After a few days, you can leave them outside
overnight. When the plants are about 18 inches tall, plant
them in the ground. Dahlias like well drained soil. While
your plants are germinating, start to augment your soil with
organic material, such as chicken manure and compost. Or,
add two or three pounds of 5-10-5 or 10-10-10 fertilizer to
100 square feet (1/4 pound per 10 square feet). You should
start your fertilization process about 6 weeks prior to
planting if using chicken manure which takes time to break
down. Avoid getting the fertilizer on the plants so rake the
fertilizer into the soil and then water. The location should have sunshine for at least 6 hours each
day.
Place the plants 30 or more inches
apart.
In hot weather areas, choose a spot
with morning sun only. As soon as the plants are in
the ground, on the same day, protect your young plants from
snails and slugs. Sprinkle snail bait liberally. Label and
stake plants other than the dwarf cultivar. Insert a four to
six foot stake into the ground at the edge of the hole
before the tuberous roots are planted. Dahlias are large
plants and require support. The tall cultivars cannot
support themselves and plant breakage will occur without
support. |
Other tips:
a.
Check your
soil for the right pH .
b.
Fertilize as
suggested by
Kevin Larkin.
c.
Various ways to protect Dahlias from
common insects.
d.
Deborah explains how to plant young dahlias in the garden. |
| |
|
Step 3: MATURING A BUSHY PLANT (May to
July)
  Your plants will grow tall rapidly. To encourage the plants
to grow more branches to bear more flowers, take these six
actions: Your plants will grow tall rapidly. To encourage the plants
to grow more branches to bear more flowers, take these six
actions:
1.
Cut off the tip of the center stem after the plant has
three sets of leaves.
2. Fertilize the plants with a well balanced fertilizer
(10-10-10) about once every three weeks.
3. Diligently monitor and eradicate undesirable pests.
4. Water at the soil level (do not use overhead spray) once
every three to four days. Water deeply each time. Do
not leave any stagnant water,
5. As the plant matures, remove the bottom two rows of
leaves.
6. As the plant gets bushy, tie the main stem to the stake |
Other tips:
a.
How to
top off the center.
b.
How to
deal pests, gophers, moles, etc.
|
| |
|
Step
4: BLOOMS, MORE BLOOMS (June to November)
To encourage your Dahlias to produce bigger and more blooms
take the following five actions:
1. Use a fertilizer that has a higher phosphorous content
such as, 10-30-20.
2. For each flower bud that appears, make sure you
disbud
any neighboring buds.
3. After a Dahlia bloom opens, cut it for your indoor
display. This will encourage more blooms. Even if you don’t
cut it, you should dead-head it by removing before pollen
appears so new blooms would be encouraged.
4. Always cut the bloom at a point that is one node below
the bloom. This will encourage more laterals to produce more
blooms.
5. Clean out the under growth of leaves, allowing for at
least 12 inches of space above the ground for good air
circulation.
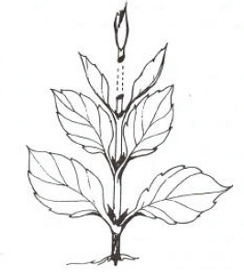
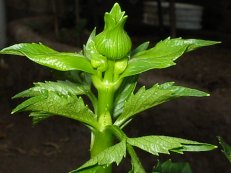 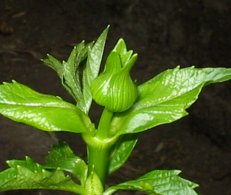 Three
flower buds becomes Three
flower buds becomes
one central bud after removal of
the two
side ones.
|
Other tips:
a.
Spray for
mildews prophylactically
b.
How
to disbud.
c.
Dealing with
diseases. |
| |
|
Step 5: PROPAGATE A NEW GENERATION
(November to January)
  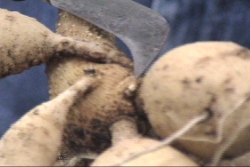  Your Dahlia plants will bloom from June to the end of
October, or even November. After October, let the plant
wither naturally with no more watering. Keep them in the
ground until December when the heads turn brown. In December
or January lop the stems to about six inches above
the base stem, leaving at least three nods, so water will
not drain down to the tubers and rot them. Make sure to
retie the label at this lowest point. In January, dig out
the tuber carefully and keep them in a cool dry place for
next year’s planting. You may divide the root tubers
for more plants next year. Your Dahlia plants will bloom from June to the end of
October, or even November. After October, let the plant
wither naturally with no more watering. Keep them in the
ground until December when the heads turn brown. In December
or January lop the stems to about six inches above
the base stem, leaving at least three nods, so water will
not drain down to the tubers and rot them. Make sure to
retie the label at this lowest point. In January, dig out
the tuber carefully and keep them in a cool dry place for
next year’s planting. You may divide the root tubers
for more plants next year. |
|
Other tips:
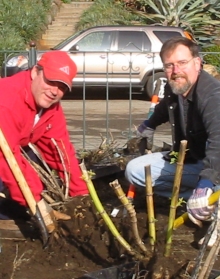
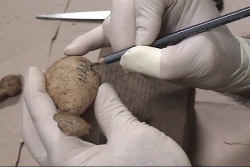
a.
How do I dig
out the tubers and divide them. Also see DSC report on
Lou Paradise demo
b. How
do I store the divided tubers.
c.
How I grow cuttings for next year’s plants. |
|
Photos courtesy of various
DSC members including: Deborah, Ted, Franck, DJ and many
others.
We like to thank many DSC Dahlia Experts for sharing their
years of experience at our regular meetings. Without them,
this essay could not have been written. |


